A little while ago we received a request on the Presentation Helper Forum to do the Ken Burns Effect in PowerPoint.
The Ken Burns Effect, named after the American documentary maker Ken Burns, is the technique of embedding still photographs in movies, displayed with slow zooming and panning effects, and fading transitions between them. The zooming and panning across photographs gives the feeling of motion, and keeps the viewer visually entertained.
The basic Ken Burns effect that is included in Apple’s iMovie software package is simply a zoom feature.

This is fairly easy to replicate in PowerPoint, by using the Grow/ Shrink command in Custom Animation. The main drawback is that you have to zoom into the centre of the image.
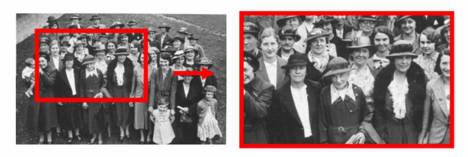
In this case we wanted to zoom in on the old lady to the left of the centre of the picture.

To do this we first need to use a Custom Motion Path to bring her to the centre of the screen.
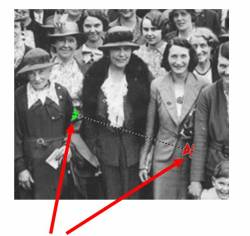
We then need to play around with the arrows in PowerPoint Custom Animation to get the animation path right. This seems to be quite fiddly to get right and does not seem to line up with where you would think it should go.
 If we combine the Grow/ Shrink and the Custom Motion path we get a good approximation of the Ken Burns effect.
An example of these animations is available to download a Power Point template.
How we did it
1. Basic Ken Burns effect using Grow/ Shrink Size:150% Speed :Slow
Select Slide Show > Custom Animation
Then on the right hand Custom Animation bar Add Effect > Emphasis > Grow/ Shrink
Then set the timing to Slow or Very Slow
2. Creating a custom motion path
Select Slide Show > Custom Animation > Add Effect > Motion Paths > Draw Custom Path > Line
Move the green and red arrows and keep testing until you get the centre of the picture in the right place (this can be very fiddly to get right)
3. Combining the motion path with Grow/ Shrink to create a combined zoom and panning effect
In custom animation add in the Grow/ Shrink as before
To make both animations start at the same time click on the second animation and change Start > With Previous
You may need to play around with the settings to get it working the way you want.
Click on the link to go to the template page.
Published On: 9th May 2007
Read more about -Animated Powerpoint Templates,PowerPoint , Hints and Tips
-
I would like to create the ken burns effect in power point 2000 for windows and power point 2004 for macs. Is this possible and if so can i have a response ASAP.
Regards Andre
Cressall Resistors Ltd
-
Andre just click on the PPT link (at the botton of the article) and you should be able to download the files to make it happen.
-
hi my name is lulwa i really needed the microsoft powerpoint for my presenation in school thx tht really helped me :p
-
I THINK THIS IS WELL GUD
-
bril
-
hihihihihi
-
how do u download it ehh aye cnt find it anywere
-
I have had no problems downloading the file off the website
Just click on the link where it says – PowerPoint File: Ken-Burns-effect.ppt
-
I need more information
-
How did he get the people to stand in the red box? Awsome, wonder if it is heavy.
-
I am missing something because I cant figure out how to get my picture in the frame. Or even how to create the frame. Thanks for you help..
-
I figured it out.. thanks,
-
how did you create a frame for your picture?
-
Can I translate it into spanish and share it referencing this page as the original source of the document?
-
i have been searching this “special effect” from web slider, video, and now i have found this for powerpoint !
nice tutorial i ever found 😀
-
Can this be reversed as a shrink/grow instead of the grow/shrink?
-
Ken Morse eat your heart out!
This is a great effect with archive photographs and paintings, especially if used sparingly
Thank you for the very clear instructions