Three tips to get the best out of PowerPoint 2010’s new features, by Philippa Leguen De Lacroix and Matthew Brown.
Enhanced Background Removal Tool
PowerPoint 2010 has massively revamped the “Background Removal” feature. It’s a s ubstantial improvement on the 2003/2007 “set transparent colour” equivalent, which was extremely limited. With the improved tool, you can precisely select which parts of a picture you’d like to remove.
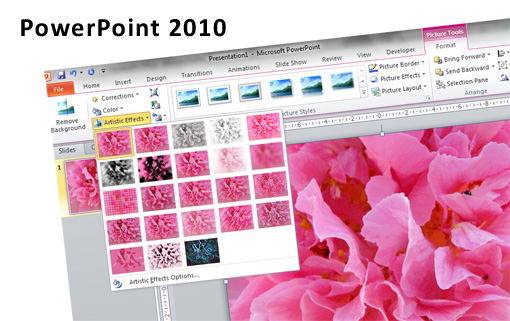
A good example would be to use it for staff biography photos that have come from a variety of sources and so all look different. We’ve got an example of two holiday snaps here. The 2010 tool allows you to remove any part of the photo you don’t want – all you have to do is click the area around the head you want to remove – the selected area turns pink, so you can easily spot which area will be removed! It’s also easy to make adjustments, by using the “mark areas to keep” or “mark areas to remove” tool (see screenshot).
When you delete the area, the content becomes transparent. If you don’t want transparency, you can always pop a coloured box behind each photo to make them smart and consistent.
The example here is head shots, but you can isolate any part of any photo. A very useful feature if the content of your photo would be otherwise lost in a busy background.
Create custom shapes with the Combine Shapes toolbar
This is a great new gadget for 2010 which advances what you can draw – and draw well – in PowerPoint.
As it’s an advanced feature (see screenshot), you have to add it to your Ribbon via PowerPoint Options like this:
“PowerPoint Options” > “Customize Ribbon” > “Commands Not in the Ribbon” > “Shape Combine, Intersect, Subtract, Union”.
We show 2 examples here: one using the “shape union” tool, and one using the “shape subtract” tool.
In our first example, we’ve simply drawn arrows as separate objects, and then used “shape union” to turn them into a single object (the example shows object with a 3D effect and a bevel).
For the second example, we’ve drawn a pentagon shape, with a cloud in the middle. Then we’ve used the “shape subtract” tool to delete the cloud from the middle, again leaving us with a single object.
Very easy to use, and very useful!
The Microsoft blog link here shows other examples of how to use this tool – http://blogs.office.com/b/microsoft-powerpoint/archive/2010/02/01/creating-custom-shapes-in-powerpoint-2010.aspx
Philippa Leguen de Lacroix, Director, Cornerstone Presentations (www.cornerstonepresentations.co.uk)
Add transitions between slides
Transitions allow you to control the appearance of changes between slides. This can give your presentation a very professional-looking visual edge when used properly. Effective transitions can help a presentation move along seamlessly.
In PowerPoint 2010, select the slide to which you want to add a transition, and then click the Transitions menu on the menu bar at the top of the window. Choose the type of transition you’d like from the gallery. Many options are available, including simple sliding movements, dissolving transitions, fades, and ripple effects.
Once your transition type has been selected, effects, timings and other options can be added to individual or all the slides. Sounds can even be added to coincide with the transition.
It may be tempting to use the most spectacular transitions for every slide, but too much extravagance can distract the audience. Instead, try transitions that smoothly move between slides and aid the flow of your presentation.
Matthew Brown is a regular contributor to Presentation Magazine