We asked Alan Cooke to review PowerPoint 2010 and write about what he considers to be three great features. Here’s what he said…….
Installing Microsoft Office Beta 2010
Downloading 2010 Beta is a painless task. All one needs is a Windows Live account and preferably a broadband connection. The ‘Professional’ version is a tad over 600Mb so a fast connection is something of a necessity.
I have 2003 installed and according to the ‘blurb’ 2010 can run alongside 2003 quite happily. The install went smoothly until a dialog box informed me politely that my 2003 installation was corrupt and needed to be repaired or removed. Not willing to remove my beloved 2003 I tried a repair twice and a reinstall once. No go! Google came to the rescue and after searching a few forums and sites I followed the advice offered and away we went. I now have 2010 and 2003 working side by side quite cheerfully. Seems the ‘corruption’ issue is pretty common as there is a good deal of advice on the matter. So if you wish to try 2010 and can’t get it installed a little research should get you up and running.
PowerPoint is one of those applications that are really fun to use and the 2010 version makes the experience all the more pleasurable. The new ‘ribbon’ layout I found very user friendly and intuitive, bearing in mind I leap-frogged over 2007. Finding features and functions easily, I was putting together my presentation in no time. I was eager to try my hand at two or three features of this new version that I had found somewhat cumbersome in 2003.
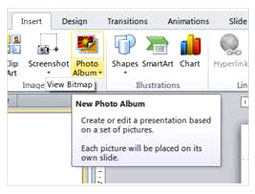
Feature 1: Creating photo albums
Figure 1: Create New Photo Album
Creating photo albums with PowerPoint 2010 is a snap (pun intended). I am all in favour of using one application to perform most tasks as opposed to having a myriad of programs on my PC. There are specialist applications for creating slide show style photo albums but PowerPoint does a perfectly adequate job for most folk and if you already have Microsoft Office, why clutter your PC up with more software? Before you install another program to create that holiday album why not try using PowerPoint first?
So dig out all those photos and let’s get started…
I find it easier if I copy all the slides I wish to use into a dedicated folder for the album. That way you can simply use the ‘CTRL+A’ key combination when it comes to selecting them all. You can always delete the odd one later once you have created your masterpiece. A dialog box opens when you choose ‘New Photo Album’ from the ribbon choice under ‘Insert’.

Figure 2: Photo Album dialog box
Using the above dialog box, you are all set to load your photos. Click ‘File/Disk….’ and navigate to where your photos are. Select those you wish to use and they are imported into PowerPoint.
Here you can see seven images loaded and ready for action. If you wish to add a text box simply click ‘New Text Box’. ‘Picture Layout’ offers choices as to how your images will be presented on your slides. The thumbnail to the right gives you a preview of the ‘layout’ options. The three ‘title’ options, if selected, activate the ‘Captions below ALL pictures’ check box. You can sort your images with the up and down arrows and ‘Remove’ any you decide against. Under the ‘Preview’ window there are options to rotate as well as change the contrast and brightness. Before we hit ‘Create’ let’s choose a theme.
Click ‘Browse…’ and choose the theme you would like to use.

Figure 3: Some of the themes that come with PowerPoint 2010
Once you have selected your theme click ‘Create’. PowerPoint does its thing and all your photos are loaded, formatted and displayed automatically.

Figure 4: Thumbnails and cover for album using a theme
Now you can use the ‘Transitions’ option to set how your slides will be presented. Not only can you choose the slide transition, you can also set the slide duration (transition duration), and a sound effect on each slide change (I particularly like the ‘camera’ sound). All of these options can be applied to one or more slides individually or you can choose the ‘Apply To All’ option.

Figure 5: Slide advance controls
The last thing to do is decide if you want the slides to advance when you click the mouse or after a period of time. Just use the ‘Advance Slide’ feature to make your choices. Now that you have your slide show photo album set up you can try different themes, add animations, embed video clips and sound tracks, etc.
Feature 2: Tweaking images and photos

Figures 6: Photo-editing tabs
PowerPoint 2010 comes with some pretty powerful photo-editing tools. Fair enough, you can’t perform the miracles that specialist software can but for tweaking your photos in situ they are just fine.
If you click on a photo in a slide you will notice two coloured tabs appear at the top of the screen. For a photo select ‘Picture Tools’. The ‘Format’ ribbon opens and displays a plethora of great features to really enhance and improve your presentation.
Starting from the left of the ribbon:

Figure 7: Image controls
‘Corrections’ offers a myriad of basic and not so basic corrections. A matrix of presets are selectable to adjust ‘sharpness and softness’ as well as ‘brightness and contrast’. Tool tips alert you to the levels. At the bottom of the matrix is the ‘Picture Corrections’ link to make further changes.
The ‘Color’ adjustments panel has even more adjustments. So if your photo has that ‘purple haze’ you may just save it using the color options settings. Again, at the bottom are further image manipulation options.
Want to get really creative? Try the artistic effects panel. You could have a lot of fun with this one. What if you don’t like what you have done? No problem. Simply click the ‘Reset Picture’ icon and all is fine with the world.
Just above the ‘Reset Picture’ icon is the ‘Compress Pictures’ icon. This clever feature will reduce your images in size (DPI not pixels) so that your presentation will be manageable for emailing or web publications, etc.
You also have a number of picture styles to choose from.
These are self-explanatory and really don’t need much comment here. Finally you have ‘Arrangement’ and ‘Sizing’ options.

Figure 8: Image styles in ribbon
Feature 3: Turn up the volume

Figure 9: Sound-clip control on slide
There is no question that a slide presentation works so much better with a sound track. With 2003 I found the easiest was to time the slide show and then edit a sound track to fit using a sound editing application such as ‘Audacity’. Not ideal, especially if you tweak timings in the presentation after adding the audio track. 2010 has improved things considerably and now it is a simple matter to add a great sound clip to create your pièce de résistance.
Here you can see the sound-clip control. You can play your sound track from any point and adjust your volume level.
The next image shows further controls, a few of which I will go over.

Figure 10: Audio controls ribbon

Figure 11: Sound-track trimming
‘Trim Audio’ A really useful tool. Once you have timed your slide show from start to finish simply set the length of the sound track using this tool. You can either use the sliders to pick your track segment or simply enter your start and end times in the appropriate boxes.
Don’t concern yourself with abrupt starts and stops, as the next tool solves that problem for you.
‘Fade In’/‘Fade Out’ To have your sound track start and end smoothly with your presentation adjust the ‘In’ and ‘Out’ times to suit your taste.

Figure 12: Slide activation
To start your album’s background music select ‘Play Across Slides’. This means that it will start on the first slide and continue through to the last where it will fade out bringing your show to a professional and polished end. Using this option also means that your sound track will start with the show. Handy if you email your show to friends and family. They can just sit back and enjoy the show with no need to click to start.
One last thing. If you do plan to send your masterpiece to friends etc. make sure you take these two precautions.
1. Save the fonts you use with the presentation. Necessary because the fonts you use might not be on the end-user’s PC.
2. Optimize or Compress your media. This compresses the sound tracks to an ideal size for email, etc.

Figure 13: Optimize and Compress (Under File/Info).
PS: 2010 now saves the sound track automatically with the show.
As I wrote this review and worked with PowerPoint 2010 I came across so many more useful features which I wished in some ways I discovered before I got this far. Never mind, next time!

Alan Cooke
Alan Cooke is a keen yachtsman, photographer and freelance writer.