In the second Presentation Utilities article Alan Cooke looks at clipping useful images and text – en masse.
When designing a presentation you often come across images and snippets of researched text that you need to copy and paste. Clipmate may be the perfect choice since it can copy both text and screen captures. In addition there is no limit to the number of ‘clips’ you can collect, all of which can be saved in a tailor-made set of ‘collections’.
First of all, let’s define a clip:
A clip could be text or graphic (screen capture), in whole or part, which is copied from the screen and inserted (pasted) into another application. This ‘copy’ and ‘paste’ action is most commonly performed by using the CTRL+C / CTRL+A and CTRL+V key combination or using the right click mouse key option. Without the use of additional software or software features (Microsoft Office does have an extended clipboard facility) one is limited to one available ‘clip’ which is stored in the computer’s memory.
Clipmate has been developed to overcome the Windows Clipboard limitations. It’s a powerful and feature rich application. This is a very brief overview.

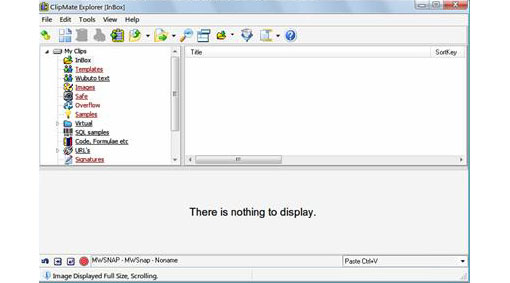
Figure 1 Clipmate main screen
Above you can see the three main sections of Clipmate. On the top left we have an explorer-style list of the default and user created folders, called ‘collections’ in Clipmate. This is where you can ‘store’ all the collections you would like to keep. For example, I have one for HTML code snippets, signatures and often used text. You could keep your ‘terms and conditions’ in a ‘legal’ collection, for example. The pane labelled ‘There is nothing to display’ is where ALL your clips are copied into as you collect them.

Figure 2 Two 'graphic' clips
In figure 2 you can see two graphic clips. Clipmate identifies the type of clip. It also records the time, date and source. In the above clip MWSnap was the application used to capture a clip of Clipmate, see Figure 3 below at the bottom.

Figure 3 The actual clip in the lower pane
A scenario. You are creating a PowerPoint presentation demonstrating some features of your website. Both text and graphics will be used. Clipmate is loaded and minimised in the system tray. Using a hotkey combination to capture a clip you can now copy all the clips you need to create your presentation.

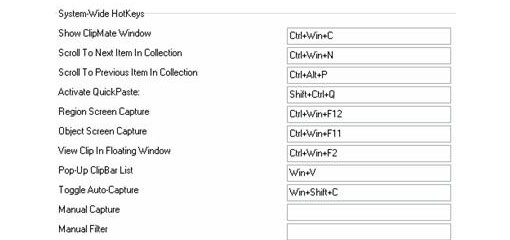
Figure 4 Hotkey combinations
I use ‘Region Screen Capture’ most commonly (note: the key combination has been changed to suit my purposes).
Using this hotkey you can capture all the graphic clips you need copied into Clipmate, one after another.
To copy text simply left click and drag (standard method) then CTRL+C and the selected text is copied into Clipmate.
In the lower pane (Figure 1) you have a number of tools which can be used to clean up the copied text. For example, you can remove all the html code (if copied from a web page) or you can strip out extra spaces, convert cases, find and replace, and a few more. It even has a spell check.
Pasting is a doddle. Clipmate detects which application you are working in. So, for example, Clipmate is aware that I am using Word right now. So with Clipmate open I simply find the clip I need to insert/paste and double click it. Hey presto! It’s right here: ‘To get your slides animated you need to use the custom animation feature in PowerPoint. For a quick guide on how to animate read our PowerPoint animation guide.’
Need a graphic next?

Done!
Clipmate has a host of amazing features and benefits as well as a comprehensive help file. It has become a regular system tray option on my PC.

Clipmate is shareware and can be downloaded here.
-
its very use full
