I recommend using the Tell ‘n’ Show method for your slides. That means putting a slide title on each slide that tells the point and adding an image, diagram, chart, etc. to show the point. You DON’T put everything you say on the slide.
I’m not the slide police and I vary from this method sometimes, especially when doing technical training, but using the Tell ‘n’ Show method will help your audience understand and remember more of what you say.
I cover the Tell ‘n’ Show method and its benefits in more detail in my blog post, “Increase understanding and retention with the Tell ‘n’ Show method.”
The Handout Problem
 When you don’t put everything you say on your slides, you have a handout problem. Many presenters want to offer handouts (usually after the presentation), but when the slides don’t include a lot of the content, the all-too-common solution of sending people the slides (printed or as a PDF) doesn’t work well.
The Handout Solution
I believe that one of the best solutions is to use Notes pages. Notes pages are a configuration of each slide and the notes that you put in the Notes pane in Normal view.
T he Notes pane is the pane below your slides. If you don’t see it, click NOTES at the bottom of the PowerPoint window to open the pane.
(By the way, another solution is to send the presentation to Microsoft Word. This method gives you the choice of offering a handout with your notes or blank lines where people can write their own notes. I explain this solution in “Making great PowerPoint handouts in Microsoft Word.”)
Notes in the Notes pane have another benefit–you can use them as presenter notes when you deliver your presentation if you display Presenter View on your computer (but Slide Show view on the screen that the audience sees). I explain Presenter View in my blog post, “Presenter View: Your secret presentation tool.”

Configure Your Notes Pages
You can customize how your Notes pages look in the Notes Master. In PowerPoint, choose the View tab, Notes Master (not Notes Page). Here’s what you’ll see:
- At the top are the header and the date
- Below that is the slide
- Below that are your notes (from the Notes pane)
- At the bottom are the footer and the page number
There are a few secrets to getting your Notes pages just the way you want them, which I explain below.
Headers and Footers
 If you don’t see the headers and footers in the Notes page display, you can add them. If you want headers and footers on your Notes pages, they MUST be on the Notes Master.
From within the Notes Master view, on the Notes Master tab, make sure the items you want are checked, as you see here. (“Body” refers to the notes.)
Then, click Close Master View to return to Normal view. I know it’s rather roundabout, but you have to configure the existence of the headers and footers from within Notes Master view, but configure their content from Normal view.
On the Insert tab, click Header & Footer, then click the Notes and Handouts tab. Here’s what you’ll see:
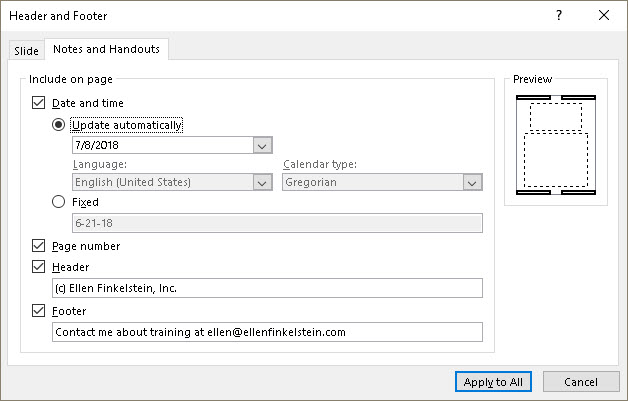
Here are the items you can configure:
- If you want the date, you can choose Update Automatically (always the current date) or Fixed (just enter the date you want).
- Check Page Number if you want page numbers.
- Check Header if you want one and type in the text.
- Check Footer if you want one and type in the text.
Click Apply to All.
You can move and resize the headers and footers. For example, you can move the headers to the bottom of the Notes page. You can also format the text–the font, font size, etc. Use the Home tab from within the Notes Master to access all the tools you usually find on the Home tab in Normal View.
Slide size and location
In the Notes Master, you can drag the slide image itself anywhere on the Notes page and resize it as well.
Tip: If you will use the Notes Pages in PDF format, consider moving the slide to the edge of the page.
Notes (“body”)
You can move and resize the Notes box. To format the text, use the Home tab from within the Notes Master.
Adding new content
You can add new content–any text or images you want. If you do, remember that it will be on every page of the Notes Pages.
Test and Correct Errors in the Notes Pages
To make sure that your Notes Pages look right, exit the Notes Master and choose View, Notes Page. Here you can scroll through your presentation to check each page. Make sure they look the way you set them up.
Warning: There’s a weird “gotcha” about Notes pages. If you change the Notes Master after you’ve created slides or if you have copied and pasted slides from another presentation, your notes pages may not take on the formatting you created in your Notes Master.
The solution is to re-apply the Notes Master. (Thanks to Sandy Johnson, Julie Terberg and other fellow PowerPoint MVPs who showed me this hard-to-find feature.) Here are the steps to follow if you see a slide that doesn’t adhere to the Notes Master:
 Right-click on a blank area of the Notes page that doesn’t look the way it should and choose Notes Layout.
- Check the Reapply Master checkbox.
- Click OK.
Print or Create PDFs of Notes Pages
The 2 main ways to use Notes Pages as handouts are to print them or create PDFs. Here are the steps:

- Save your presentation.
- Choose File, Print.
- To the right of Full Page Slides, click the down arrow and choose Notes Pages. You’ll see the Notes Pages to the right and can again scroll through them to check that they are correctly formatted.
- Under Printer, choose your printer or click the down arrow to choose a PDF driver. A PDF driver is a file that saves the result of printing to a PDF file. You can choose Microsoft Print to PDF or another PDF driver that you have installed. (Examples are Adobe PDF or PDF995.)
- Click the Print button.
- If you chose to print to a PDF, the Save Print Output As dialog box will open so you can name the file and choose a location.
- Click Save to create the PDF file.
Note: While you can create a PDF of slides only by choosing File, Export (or Save & Send or Publish in earlier versions of PowerPoint), you can’t create a PDF of Notes Pages that way. You need to use the Print feature as I just described.
Other Resources for Creating Handouts
See these blog posts for more information on creating handouts…
“Manage the presentation process from conception to rehearsal to handouts”
“Presentation handouts: Yes or no, what kind, and when?”
“Handouts for data-heavy presentations”
This blog post has been re-published by kind permission of Ellen Finkelstein – View the original post .