2010 has come of age when it comes to embedding videos. In just a few simple steps you can select a video clip from your PC or a website (don’t forget the all-important copyright issues, though) and embed it in your presentation.
A couple of pointers regarding video formats
When it comes to which file format is best to use in a presentation I guess there are as many opinions as there are file formats. Suffice it to say that when it comes down to it you will probably find that either one of these will work perfectly satisfactorily on almost all computers.
- AVI (Audio Video Interleave) – A long-established format that will work fine as long as you bear in mind that it is a bit heavy on file size. Figure on about 5mb for a 1 hour video. Admittedly, an hour-long video clip in a presentation is somewhat extreme but it always pays to keep files as small and compact as possible. Quality of these files is excellent.
- WMV (Windows Media Video) – This is a compressed video format and therefore a smaller file size. My choice would be this format as it provides the best compromise between quality and size.
- MPEG – (Moving Pictures Experts Group) – This format is also perfectly suitable for presentations as these files are also much smaller and are of high quality.
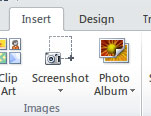
Fig 2. Ribbon - insert
For more in-depth discussion on video formats a quick Google will provide a wealth of information. Any one of the above will be more than satisfactory for your presentation, though.
Embedding your video clip
Make sure you have selected ‘Insert’ on your ribbon. By the way, a quick way to do this is to use the mouse wheel to choose between ‘File’, ‘Home’, ‘Insert’, etc. The scroll wheel jumps from tab to tab as you scroll the wheel. Or simply click the tab to select.

Fig 3. Video selection icon
On the right is the ‘Video’ insert menu/ribbon selection icon and on clicking you are offered three further choices. We will deal with them from top to bottom.
Video from File
Selecting this option will open a dialog box so that you can navigate to where your video clip is filed on your PC.

Fig 4. Video dialog box
Once you have found your clip and selected it, click the insert button and the clip is embedded into your slide, as you can see here.

Fig 5. Inserted video clip
The image below shows the formatting dialog box for the video player inserted into your slide.

Fig 6. Formatting options
Customising the video player is straightforward and provides a good range of options, such as border colour and style. Also available are adjustments for the video itself. Selecting the ‘Video’ option offers brightness and contrast options of the video output.
Power Point 2010 offers video editing functionality as well. No more do you have to spend ages editing in complicated software to get the length of the video clip correct.
Notice the ‘Trim Video’ option on the left? What a bonus! Selecting this option opens a simple window where you can tweak your video clip to the exact length you require.

Fig 7. Video editing options
Below the thumbnail of the video on the right in Fig. 8 you can see a green and a red marker.
Click and drag the green marker to your starting point. Note how the thumbnail adjusts to show you the starting point.
The red marker works in the same way. Just drag it to your end point. The Start and End time fields show the corresponding times and top right you can see the duration of your video clip.
Before I move onto the next choice of video embedding, take a look at the ‘Size’ option. You can see this in the Formatting options image in Fig. 6 above. With this option you can change the video display to suit your slide.

Fig 8. Editing dialog
Video from Website
On the right is the dialog box that opens when you choose to add a video from a website.
Let’s suppose you have a number of video clips on YouTube, or perhaps your website has a video you would like to add to the presentation.

Fig 9. Video embedding dialog from websites

Fig 10. Embedded video player
On the right is an embedded video clip from the Call Centre Helper YouTube page.
Note: You must choose the ‘Old embed code’ option. None of the other options will work. PowerPoint alerts you to this when you click insert after you have copied and pasted the embed code into the window in Fig. 9.
Below you can see a snapshot of the embed option on the YouTube website for Call Centre helper.

Fig 11. Embed code and player options from YouTube
To embed your video into your presentation you need to copy all the code in the window above, starting from “<object width……through to……/object>”. On the next page you can see the code embedded in the Power Point dialog.
A couple of points
1. Make sure you have ticked the ‘Use old embed code [?] check box
2. You can choose your player size on the YouTube site. It’s at the bottom of the dialog you see above (left out to save space).
3. Make sure you have set your player dimensions before you copy the code.

Fig 12. Embedded code

Fig 13. Video play button
Once you have clicked ‘Insert’ your video is set up on your slide. My example displayed a black rectangle which took me by surprise at first. Not to worry, take a look top left of the ribbon and you will see a play arrow.
You can also double-click the player to begin the video.
By the way, don’t forget to take a look at the many formatting options for the video clip in the ‘Video tools’ ribbon.
The last option allows you to add Clip Art to a presentation

Fig 14. Clip art dialog
On the right is a snip from the Clip Art pane that opens when you choose the Clip Art option under Insert/Video in the ribbon. I chose the man fishing and once clicked it is dropped into the slide. Unlike the other two video options, you will not be able to preview this. To see the clip animate you must run the show (F5). Once again, don’t forget to experiment with the ‘Picture Tools’ – ‘Format’ options in the ribbon.
It might make the difference between an ‘okay’ presentation and a ‘knock out’ one.
Alan Cook is a Technical Writer and regular contributor to Presentation Magazine.
Any questions or suggestions, please feel free to add them in the comments box below.
Recommended Pages


-
the tutorial is good thanks
-
RE: “Figure on about 5mb for a 1 hour video.”
Are you asleep at the keyboard???
5mb for an hour video so small you can’t see it. -
_How to embed videos in your PowerPoint presentation_ Blinds And
Shades ended up being a quite excellent article, .
Keep authoring and I am going to keep on viewing!
Thanks ,Janine -
thank you for such kind info
- Abstract
- Animal
- Animated
- Architecture
- Birthday
- Business
- Calendar
- Celebration
- Christmas
- Clip Art
- Maps
- Educational
- Engineering
- Flags
- Food and Drink
- Landmarks
- Medical
- Nature
- Pattern
- Science
- Shape
- Sport
- Transport
- Travel
- Valentines
- Weather
- Wedding
- Subtle Waves Template
- Business world map
- Filmstrip with Countdown
- Business 1
- Blue Bubbles
- Corporate 2
- Vector flowers template
- Filmstrip
- Editable PowerPoint newspapers
- Hands Template
- Red blood cells slide
- Circles Template on white
- Maps of America
- Light Streaks Business Template
- Zen stones template
- Heartbeat Template
- Web icons template
- Chalkboard